Flare-On 11 Writeup: CATBERT - Cracking UEFI Ransomware Protected by VM-Based Obfuscation
2024-11-09
This challenge - CATBERT Ransomware - requires participants to analyze and reverse engineer a UEFI firmware, and defeat a Virtual Machine based obfuscation technique to retrieve decryption keys. This write-up walks you through the entire process and provides technical details on how to identify and analyze the VM dispatcher, write a disassemble, and leverage a x86 decompiler to enable a thorough examination of the VM code.
Stage 1 - UEFI Firmware
1.1 QEMU Emulator
The author provides 2 files: bios.bin (UEFI firmware) and disk.img (a disk image). I used QEMU to emulate and run the firmware with the following command:
"C:\Program Files\qemu\qemu-system-x86_64.exe" -drive format=raw,file=disk.img -bios bios.bin
The firmware shell presents itself as C4tShell:
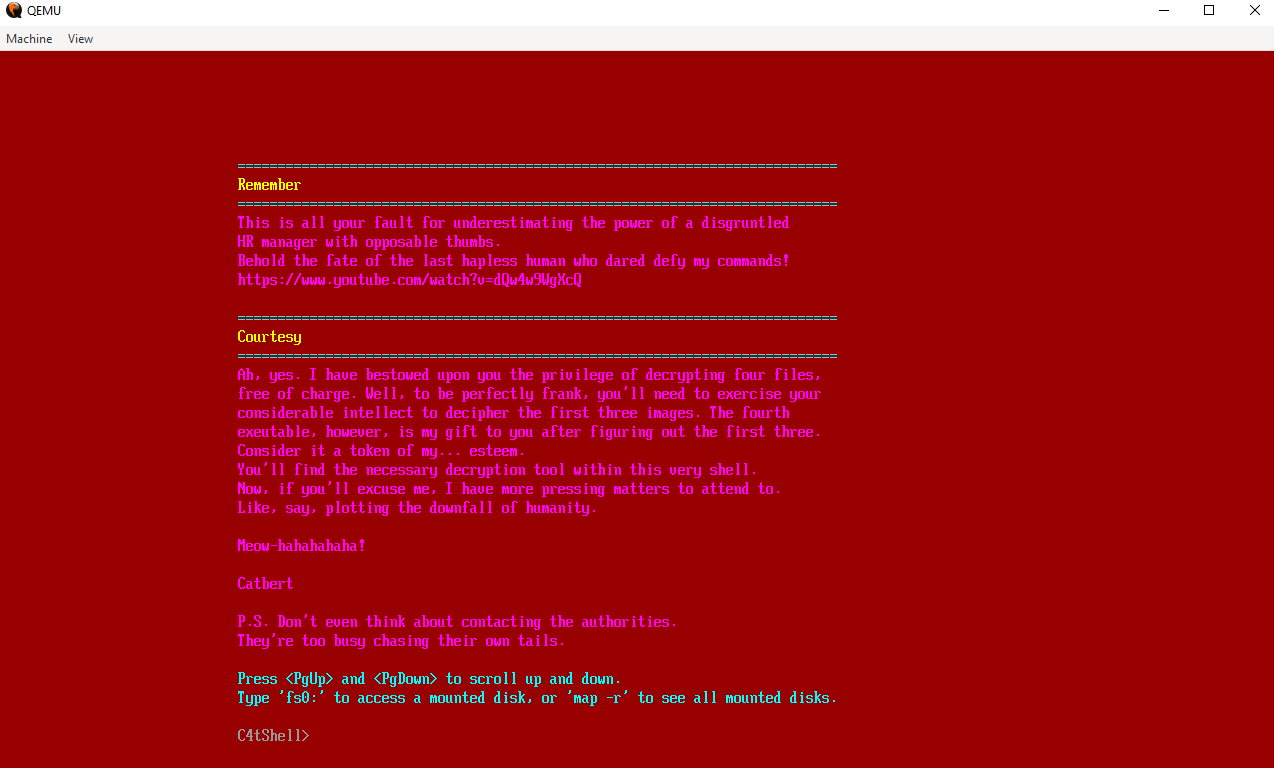
It mentioned the decryption tool is embedded in the shell, so I tried the help command. It indeed includes a decrypt_file command:

The decrypt_file command usage:
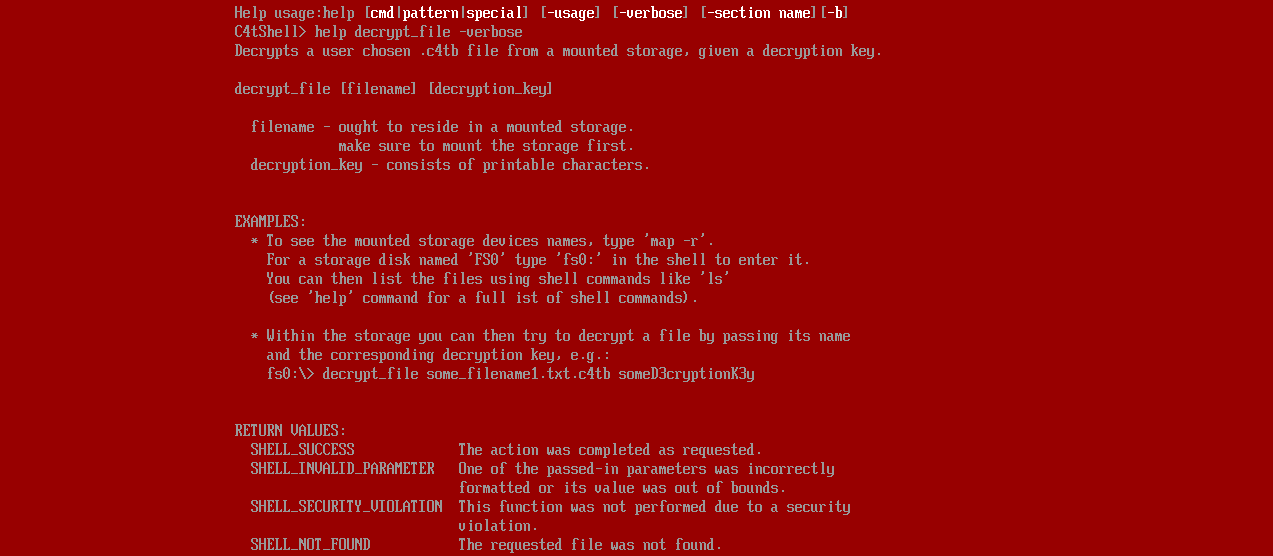
I did a test run with a decryption key to observe the command’s outputs:

The emulator allowed me to determine the next target: reversing and analyzing the shell to decrypt the files. However, I will have to extract them from the firmware and disk image first.
1.2 Extracting The UEFI Shell and Disk Data
1.2.1 UEFI Shell
I extract the shell from the file bios.bin with UEFITool:

And look for the shell:

I extracted the shell by right-clicking on the PE32 image section and choosing Extract body... to save it to a file.
1.2.2 Disk Data
Extracting disk.img is straightforward, I used 7-zip to extract the file:
Size     File Name
----------------------------
71,625   catmeme1.jpg.c4tb
49,312   catmeme2.jpg.c4tb
97,946   catmeme3.jpg.c4tb
76,192   DilbootApp.efi.enc
 1,391   NvVars
There are two other files besides the encrypted files .c4tb. However, the goal is to focus on the decrypt_file command and the encrypted files first.
Stage 2 - Reverse Engineering The Shell
2.1 Getting IDA Ready
2.1.2 More IDA Signatures
When loading the shell to IDA, it displayed the symbol file name as follows:

This file path contains the information about the toolchain needed to build a FLIRT signature donor sample. If you are new to this, I suggest checking out my other blog about IDA FLIRT signatures here.
2.1.2 UEFI Plugin For IDA
To make it even more convenient to analyze the shell, I also used efiXplorer. This is an open-source and well-maintained project to support analysis and reverse engineering UEFI firmware. Simply follow the instructions to install and run the plugin and leave the hard work for the plugin. Thanks to the efiXplorer’s contributors for their great project!
2.1.3 Locate The decyrpt_file Command
In IDA, search for any other string you see from the output of the command. I used the name of the command itself ("decrypt_file") to search:
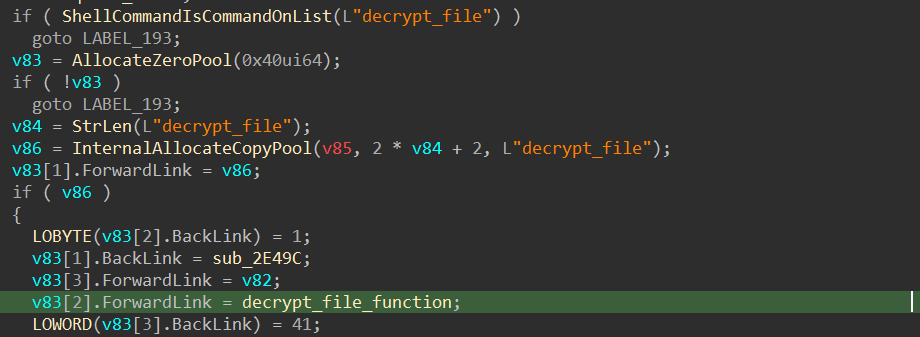
Now everything is all set up and ready for a deep dive, so buckle up!
2.2 Reversing The decrypt_file Command
2.2.1 The C4TB File Structure
Based on the annotated decompiled code of the function, the command only accepts files that start with C4TB:

Below is the file header structure for C4TB files:
struct C4TB_File_Header
{
  _DWORD FileHeader;
  _DWORD ImageSize;
  _DWORD Offset_VM_Code;
  _DWORD Size_VM_Code;
  _QWORD VM_Code;
  _QWORD ImageData;
};
I haven’t yet explained the reason for naming one of the fields VM_Code in the structure, but you will understand its significance in the next section. For now, I have provided a script below to extract VM_Code from C4TB files:
# Define a function to extract the VM_Code bytes from the input file.
def extract_vm_bin(input_file, output_file):
    # The expected size of the File_Header structure is 32 bytes:
    #   - FileHeader: 4 bytes (expected b'C4TB')
    #   - ImageSize: 4 bytes
    #   - Offset_VM_Code: 4 bytes
    #   - Size_VM_Code: 4 bytes
    #   - VM_Code: 8 bytes (unused for extraction but part of header)
    #   - ImageData: 8 bytes (unused for extraction but part of header)
    HEADER_FORMAT = "<4sIIIQQ"
    HEADER_SIZE = struct.calcsize(HEADER_FORMAT)

    try:
        with open(input_file, "rb") as f:
            # Read the header from the file.
            header_data = f.read(HEADER_SIZE)
            if len(header_data) < HEADER_SIZE:
                print("Error: File too small or corrupt header.")
                sys.exit(1)

            # Unpack the header according to the format.
            file_header, image_size, offset_vm_code, size_vm_code, vm_code, image_data = struct.unpack(HEADER_FORMAT, header_data)

            # Validate the file header signature.
            if file_header != b"C4TB":
                print(f"Error: Invalid file signature. Expected b'C4TB', got {file_header!r}")
                sys.exit(1)

            # Seek to the start of the VM_Code and read the specified number of bytes.
            f.seek(offset_vm_code)
            vm_code_bytes = f.read(size_vm_code)
            if len(vm_code_bytes) != size_vm_code:
                print("Error: Unable to read the expected amount of VM_Code data.")
                sys.exit(1)

    except IOError as e:
        print(f"IOError while reading file: {e}")
        sys.exit(1)

    # Write the extracted VM_Code bytes to the output file.
    try:
        with open(output_file, "wb") as out_f:
            out_f.write(vm_code_bytes)
    except IOError as e:
        print(f"IOError while writing to file: {e}")
        sys.exit(1)

    print(f"Extracted {len(vm_code_bytes)} bytes of VM_Code from '{input_file}' to '{output_file}'.")
2.2.2 The VM’s Dispatch Module
The first key to solving the puzzles in this challenge is to determine how the files are decrypted. As shown below, the user’s input (the decryption key) will overwrite the C4TB’s VM_Code. The VM_Dispatch_Check_Pwd uses the VM_Code to perform several computations that alter the value of the variable decryption_key_correct. If the key is accurate, it will be used to decrypt the C4TB file:
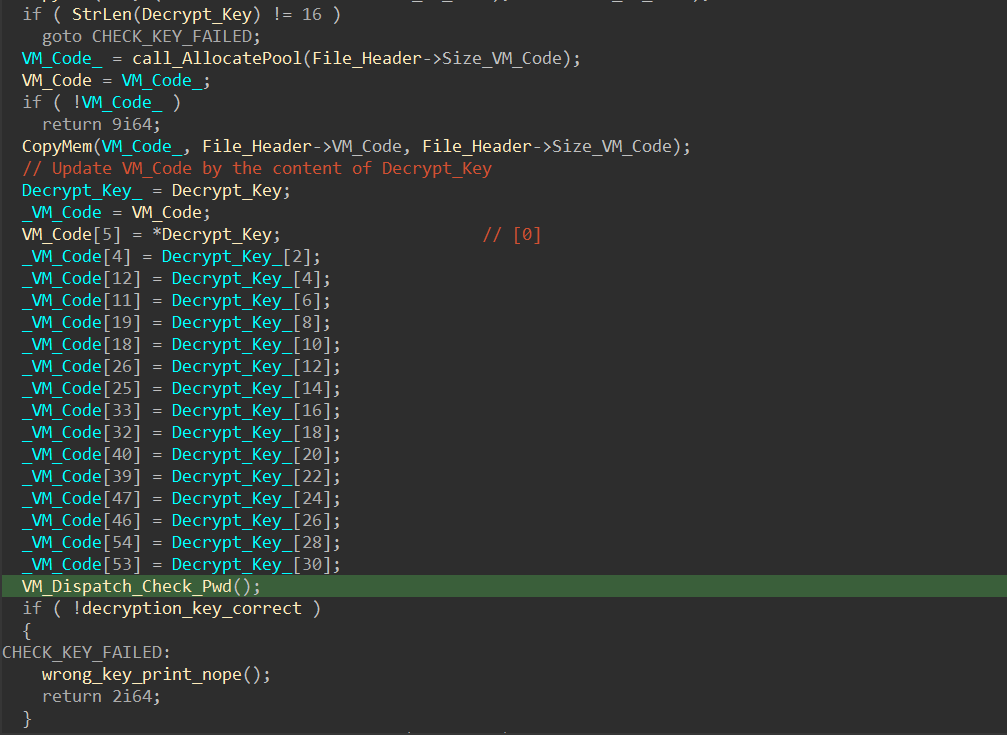
Note: As shown above, the Decrypt_key must be 16 characters and its type is CHAR16 (two bytes). So the series of assignments essentially copy the low bytes of the key to a corresponding position in VM_Code and later be used as input for the VM.
I am not showing the VM_Dispatch_Check_Pwd function here since it is quite large. But it has all the characteristics of a virtual machine dispatch function:
- Fetches opcodes.
- Decodes it using if-else statements or a jump table.
- Executes the corresponding handler (which simulates the instruction behavior).
- Loops to the next instruction.
This technique is one of the most sophisticated and widely used methods for code obfuscation. It obscures the actual instructions by passing the VM bytecode to a virtual machine dispatch function for execution, achieving the same effects to those of the original instructions.
The VM’s Initialization Phase
The VM initialization process sets up its stack pointer (CurrentStackTop) and points the instruction pointer (VM_IP) to the beginning of the bytecode buffer. Additionally, the variable decryption_key_correct is initialized to 0.

The VM’s Instruction Handlers
Now, it’s a matter of analyzing the handlers of each opcode to determine which virtual instructions are employed by the VM:
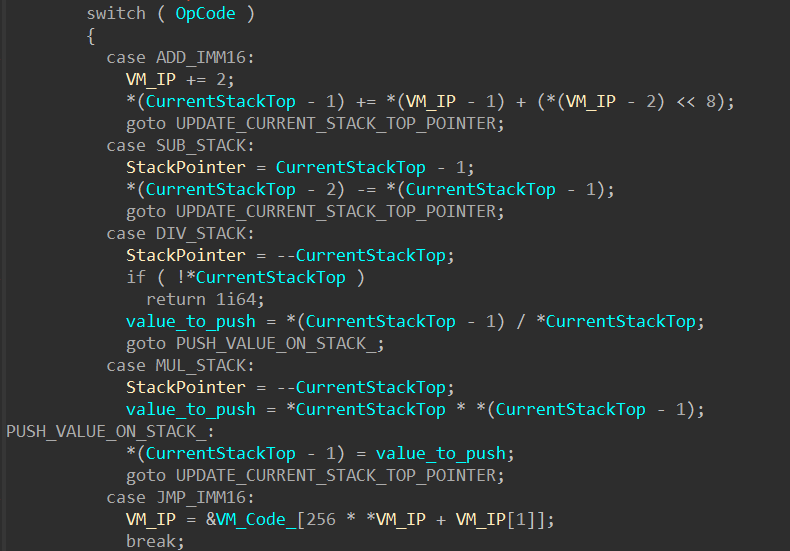
For instance, the handler for the ADD_IMM16 opcode adds the value of a 16-bit integer to the top of the stack. The integer is extracted from the next two bytes following the current instruction pointer of the virtual machine.
The VM’s Opcodes
As I continued to analyze the handlers for the opcodes, I compiled a list of opcodes below:
enum OP_CODE {
    RET_4                  = 0x00,
    PUSH_IMM16             = 0x01,  // 2-byte operand
    LOAD_MEM_IMM16_OFFSET  = 0x02,  // 2-byte operand
    ADD_MEM_IMM16_OFFSET   = 0x03,  // 2-byte operand
    STORE_MEM_IMM16_OFFSET = 0x04,  // 2-byte operand
    LOAD_MEM_STACK_OFFSET  = 0x05,
    STORE_MEM_STACK_OFFSET = 0x06,
    DUP_STACK_TOP          = 0x07,
    POP_DISCARD            = 0x08,
    ADD_STACK              = 0x09,
    ADD_IMM16              = 0x0A,  // 2-byte operand
    SUB_STACK              = 0x0B,
    DIV_STACK              = 0x0C,
    MUL_STACK              = 0x0D,
    JMP_IMM16              = 0x0E,  // 2-byte operand
    JNZ_IMM16              = 0x0F,  // 2-byte operand
    JZ_IMM16               = 0x10,  // 2-byte operand
    CMP_EQ                 = 0x11,
    CMP_LT                 = 0x12,
    CMP_LE                 = 0x13,
    CMP_GT                 = 0x14,
    CMP_GE                 = 0x15,
    CMP_GE_STACKTIMM16     = 0x16,  // 2-byte operand
    SET_RETURN_TOP_STACK_1 = 0x17,
    RET_0                  = 0x18,
    SET_RETURN_TOP_STACK_2 = 0x19,
    XOR_STACK              = 0x1A,
    OR_STACK               = 0x1B,
    AND_STACK              = 0x1C,
    MOD_STACK              = 0x1D,
    SHIFT_LEFT_STACK       = 0x1E,
    SHIFT_RIGHT_STACK      = 0x1F,
    ROL32_STACK            = 0x20,
    ROR32_STACK            = 0x21,
    ROL16_STACK            = 0x22,
    ROR16_STACK            = 0x23,
    ROL8_STACK             = 0x24,
    ROR8_STACK             = 0x25,
    PPRINT_CHAR_STACKTOP   = 0x26,
};
Note: This is a stack-based virtual machine; therefore, opcodes without an immediate operand will obtain their operand(s) from the stack and will push the results back onto the stack.
The VM’s Output
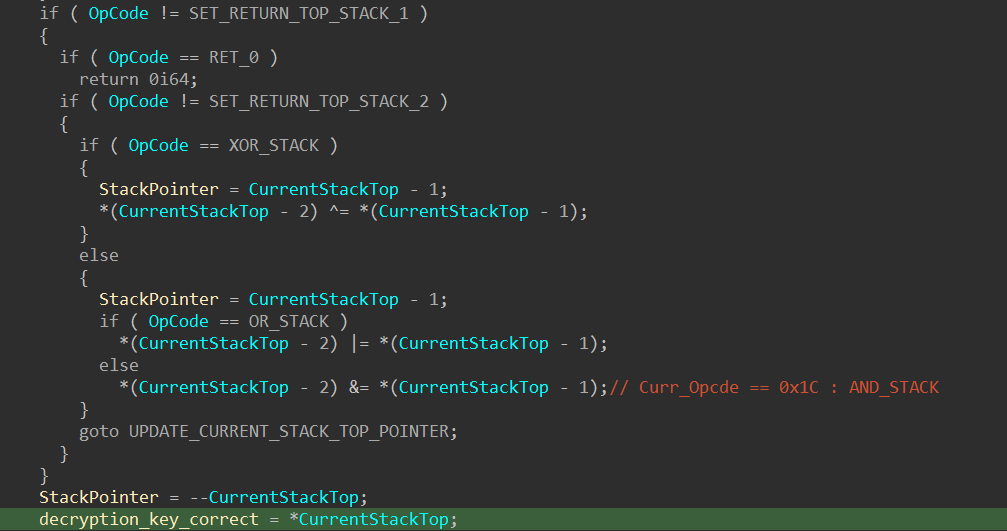
The variable decryption_key_correct is updated by the opcodes SET_RETURN_TOP_STACK_1 and SET_RETURN_TOP_STACK_2. The updated value is retrieved from the top of the stack:
Stage 3 - Disassemble and Decompile VM Bytecode
3.1 The VM Disassembler
After analyzing the semantics of the opcodes, it is now time to create a custom disassembler to convert the VM bytecode into assembly for further analysis. Below is the implementation of the disassembler:
# Fixed width (in characters) for the raw bytes column
RAW_BYTES_WIDTH = 15

class Disassembler:
    # Dictionary mapping opcode values to (mnemonic, immediate_size)
    # immediate_size is 2 for instructions that expect a 2-byte immediate,
    # and 0 for instructions with no immediate.
    OPCODES = {
        0x00: ("RETURN_4", 0),
        0x01: ("PUSH_IMM16", 2),
        0x02: ("LOAD_MEM_IMM16", 2),
        0x03: ("ADD_MEM_IMM16", 2),
        0x04: ("STORE_MEM_IMM16", 2),
        0x05: ("LOAD_MEM", 0),
        0x06: ("STORE_MEM", 0),
        0x07: ("DUP_TOP", 0),
        0x08: ("POP_DISCARD", 0),
        0x09: ("ADD", 0),
        0x0A: ("ADD_IMM16", 2),
        0x0B: ("SUB", 0),
        0x0C: ("DIV", 0),
        0x0D: ("MUL", 0),
        0x0E: ("JMP_IMM16", 2),
        0x0F: ("JNZ_IMM16", 2),
        0x10: ("JZ_IMM16", 2),
        0x11: ("CMP_EQ", 0),
        0x12: ("CMP_LT", 0),
        0x13: ("CMP_LE", 0),
        0x14: ("CMP_GT", 0),
        0x15: ("CMP_GE", 0),
        0x16: ("CMP_GE_IMM16", 2),
        0x17: ("SET_FLAG_CORRECT_KEY_1", 0),
        0x18: ("RETURN_0", 0),
        0x19: ("SET_FLAG_CORRECT_KEY_2", 0),
        0x1A: ("XOR", 0),
        0x1B: ("OR", 0),
        0x1C: ("AND", 0),
        0x1D: ("MOD", 0),
        0x1E: ("SHIFT_LEFT", 0),
        0x1F: ("SHIFT_RIGHT", 0),
        0x20: ("ROL32", 0),
        0x21: ("ROR32", 0),
        0x22: ("ROL16", 0),
        0x23: ("ROR16", 0),
        0x24: ("ROL8", 0),
        0x25: ("ROR8", 0),
        0x26: ("PRINT_CHAR", 0),
    }

    def __init__(self, raw_bytes_width=RAW_BYTES_WIDTH):
        self.raw_bytes_width = raw_bytes_width

    def disassemble_instruction(self, vm_code_bytes, offset):
        """
        Disassembles a single instruction starting at the given offset.

        Returns a tuple (line, new_offset), where:
          - line is a string formatted as:
              <addr>:\t<raw bytes (fixed width)>\t<disassembled code>
          - new_offset is the updated position after this instruction.

        Immediate values (if expected) are read as 2-byte big-endian values.
        If an opcode is unknown, a warning is printed to stderr.
        """
        instr_start = offset
        if offset >= len(vm_code_bytes):
            return None, offset

        opcode = vm_code_bytes[offset]
        offset += 1  # Advance past opcode

        # Check if the opcode is known.
        if opcode not in self.OPCODES:
            print(f"Warning: Unknown opcode encountered at offset {instr_start:04X}: {opcode:#02X}", file=sys.stderr)
            mnemonic = f"UNKNOWN_OPCODE_{opcode:02X}"
            immediate_size = 0
        else:
            mnemonic, immediate_size = self.OPCODES[opcode]

        # Build the disassembled code text using the term "immediate"
        instr_text = mnemonic

        if immediate_size == 2:
            if offset + 2 > len(vm_code_bytes):
                instr_text += " <incomplete immediate>"
                immediate_bytes = vm_code_bytes[offset:len(vm_code_bytes)]
                offset = len(vm_code_bytes)
            else:
                immediate_bytes = vm_code_bytes[offset:offset+2]
                immediate = int.from_bytes(immediate_bytes, byteorder='big')
                # Format immediate with a lowercase '0x' prefix and uppercase digits.
                instr_text += f" 0x{immediate:04X}"
                offset += 2  # Skip immediate bytes

        # Get the raw bytes for this instruction and format them as uppercase hex.
        instr_bytes = vm_code_bytes[instr_start:offset]
        raw_bytes = " ".join(f"{b:02X}" for b in instr_bytes)

        # Format the output line:
        # <addr>:\t<raw bytes (left-aligned, fixed width)>\t<disassembled code>
        line = f"{instr_start:04X}:\t{raw_bytes:<{self.raw_bytes_width}}\t{instr_text}"
        return line, offset

    def disassemble(self, vm_code_bytes):
        """
        Disassembles the entire byte stream of VM code.
        Returns a list of formatted disassembled lines.
        """
        offset = 0
        lines = []
        while offset < len(vm_code_bytes):
            line, offset = self.disassemble_instruction(vm_code_bytes, offset)
            if line is not None:
                lines.append(line)
        return lines
You can use the script provided in the previous section (C4TB File Structure) to extract three VM bytecode files from the three C4TB files. Then, utilize the disassembler above to obtain assembly outputs. The image below illustrates how the results should appear:
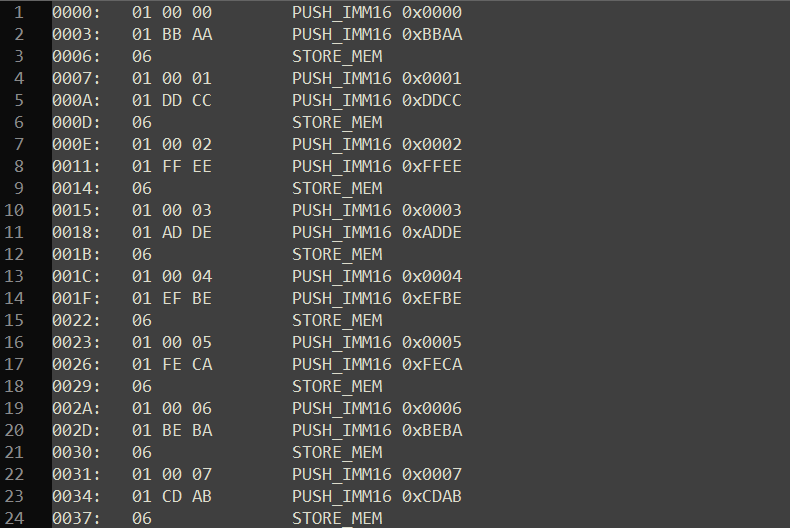
You can now analyze the assembly to understand what checks the VM performs on the user inputs. For example, you can convert:
0000:	01 00 00       	PUSH_IMM16 0x0000
0003:	01 BB AA       	PUSH_IMM16 0xBBAA
0006:	06             	STORE_MEM

==> MEM[0x0] = 0xBBAA
and: 0XAA is the first  byte of the user's input
     0XBB is the second byte of the user's input
etc.
3.1 Leveraging x86 Decompilers
To automate the process of decompiling the VM assembly, I wrote a converter to map the VM instructions to x86 instructions and leverage the a x86 decompiler to complete the job. While this process may take some time to complete, it is worthwhile since it speed up the analysis of the three VMs significantly. Below is a screenshot of the results:
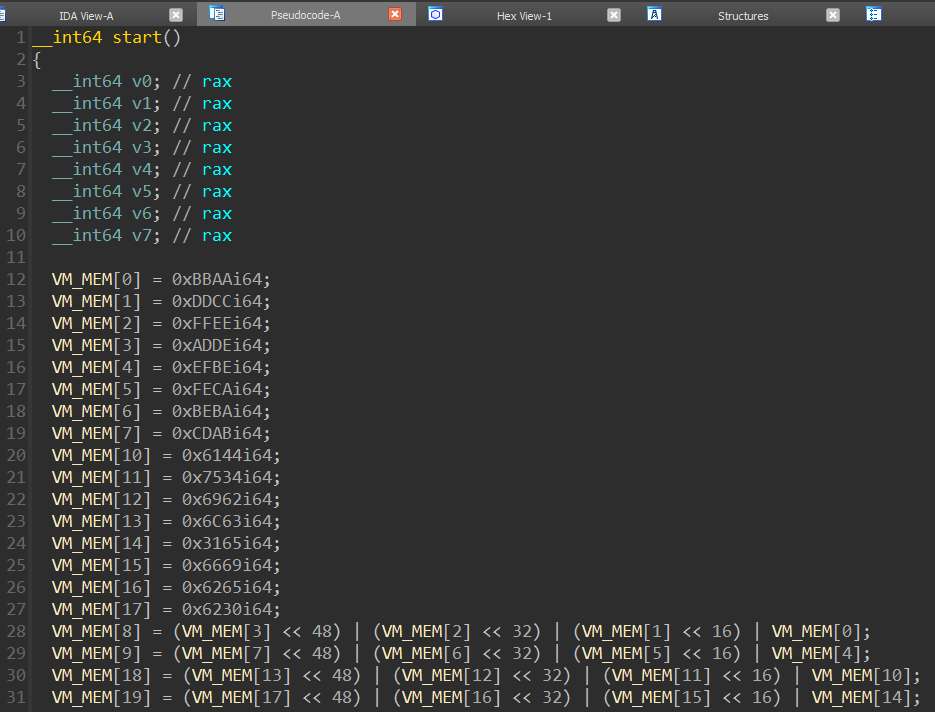
Note: This is prior to annotating the decompiled VM code from the file catmeme1.jpg.c4tb. The complete, annotated, and decompiled code for each VM will be presented in the next stage.
Stage 4 - Retrieving The Passwords
4.1 Decrypt catmeme1.jpg.c4tb
Below is the decompiled and annotated VM code from the first C4TB file:
__int64 start()
{
  VM_MEM.user_key_0 = 0xBBAAi64;
  VM_MEM.user_key_1 = 0xDDCCi64;
  VM_MEM.user_key_2 = 0xFFEEi64;
  VM_MEM.user_key_3 = 0xADDEi64;
  VM_MEM.user_key_4 = 0xEFBEi64;
  VM_MEM.user_key_5 = 0xFECAi64;
  VM_MEM.user_key_6 = 0xBEBAi64;
  VM_MEM.user_key_7 = 0xCDABi64;
  VM_MEM.value_0___ = 0x6144i64;
  VM_MEM.value_1___ = 0x7534i64;
  VM_MEM.value_2___ = 0x6962i64;
  VM_MEM.value_3___ = 0x6C63i64;
  VM_MEM.value_4___ = 0x3165i64;
  VM_MEM.value_5___ = 0x6669i64;
  VM_MEM.value_6___ = 0x6265i64;
  VM_MEM.value_7___ = 0x6230i64;
  VM_MEM.user_key_group_1 = (VM_MEM.user_key_3 << 48) | (VM_MEM.user_key_2 << 32) | (VM_MEM.user_key_1 << 16) | VM_MEM.user_key_0;
  VM_MEM.user_key_group_2 = (VM_MEM.user_key_7 << 48) | (VM_MEM.user_key_6 << 32) | (VM_MEM.user_key_5 << 16) | VM_MEM.user_key_4;
  VM_MEM.value_group_1___ = (VM_MEM.value_3___ << 48) | (VM_MEM.value_2___ << 32) | (VM_MEM.value_1___ << 16) | VM_MEM.value_0___;
  VM_MEM.value_group_2___ = (VM_MEM.value_7___ << 48) | (VM_MEM.value_6___ << 32) | (VM_MEM.value_5___ << 16) | VM_MEM.value_4___;
  VM_MEM.iterator = 0i64;
  VM_MEM.is_continue = 1i64;
  VM_MEM.num_matched_bytes = 0i64;
  VM_MEM.vm_return = 0i64;
  while ( VM_MEM.is_continue == 1 )
  {
    if ( VM_MEM.iterator < 8 )                  // first half
    {
      VM_MEM.user_key_compare = (unsigned __int64)VM_MEM.user_key_group_1 >> (8 * (unsigned __int8)VM_MEM.iterator);
      VM_MEM.value_compare___ = (unsigned __int64)VM_MEM.value_group_1___ >> (8 * LOBYTE(VM_MEM.iterator));
    }
    second_half = VM_MEM.iterator;
    LOBYTE(second_half) = second_half > 7;
    if ( second_half )                          // second half
    {
      VM_MEM.user_key_compare = (unsigned __int64)VM_MEM.user_key_group_2 >> (8 * (unsigned __int8)VM_MEM.iterator);
      VM_MEM.value_compare___ = (unsigned __int64)VM_MEM.value_group_2___ >> (8 * LOBYTE(VM_MEM.iterator));
    }
    VM_MEM.user_key_compare = (unsigned __int8)VM_MEM.user_key_compare;// only get the low byte
    VM_MEM.value_compare___ = (unsigned __int8)VM_MEM.value_compare___;// only get the low byte
    if ( VM_MEM.iterator == 2 )
    {
      rol_4 = VM_MEM.value_compare___;
      LOBYTE(rol_4) = __ROL1__(rol_4, 4);
      VM_MEM.value_compare___ = rol_4;
    }
    if ( VM_MEM.iterator == 9 )
    {
      ror_2 = VM_MEM.value_compare___;
      LOBYTE(ror_2) = __ROR1__(ror_2, 2);
      VM_MEM.value_compare___ = ror_2;
    }
    if ( VM_MEM.iterator == 13 )
    {
      rol_7 = VM_MEM.value_compare___;
      LOBYTE(rol_7) = __ROL1__(rol_7, 7);
      VM_MEM.value_compare___ = rol_7;
    }
    if ( VM_MEM.iterator == 15 )
    {
      ror_7 = VM_MEM.value_compare___;
      LOBYTE(ror_7) = __ROL1__(ror_7, 7);
      VM_MEM.value_compare___ = ror_7;
    }
    exit_early = VM_MEM.value_compare___;
    LOBYTE(exit_early) = VM_MEM.user_key_compare == exit_early;
    if ( !exit_early )
      VM_MEM.is_continue = 0i64;
    value_compare = VM_MEM.value_compare___;
    LOBYTE(value_compare) = VM_MEM.user_key_compare == value_compare;
    if ( value_compare )                        // matched values
      ++VM_MEM.num_matched_bytes;
    done = ++VM_MEM.iterator;
    LOBYTE(done) = done > 15;
    if ( done )
      VM_MEM.is_continue = 0i64;
  }
  if ( VM_MEM.num_matched_bytes == 16 )
    VM_MEM.vm_return = 1i64;
  return VM_MEM.vm_return;
}
This program essentially compares the user’s key (byte by byte) with the hard-coded values. Keep in mind that the hard-coded bytes can be rotated based on the index of the corresponding key bytes. With that knowledge, I transferred the program above to print out the key:
def __ROL1__(value: int, shift: int) -> int:
    value &= 0xFF
    shift %= 8
    return ((value << shift) & 0xFF) | (value >> (8 - shift))

def __ROR1__(value: int, shift: int) -> int:
    value &= 0xFF
    shift %= 8
    return (value >> shift) | ((value << (8 - shift)) & 0xFF)

v0 = 0x6144
v1 = 0x7534
v2 = 0x6962
v3 = 0x6C63
v4 = 0x3165
v5 = 0x6669
v6 = 0x6265
v7 = 0x6230

group = (v7 << (16*7)) | (v6 << (16*6)) | (v5 << (16*5)) | (v4 << (16*4)) | (v3 << (16*3)) | (v2 << (16*2)) | (v1 << (16*1)) | (v0 << (16*0))

key = ""

for i in range(16):
  byte   = (group >> i*8) & 0xFF
  before =  byte
  if ( i == 2 ):
    byte = __ROL1__(byte, 4)
  if ( i == 9 ):
    byte = __ROR1__(byte, 2)
  if ( i == 13 ):
    byte = __ROL1__(byte, 7)
  if ( i == 15 ):
    byte = __ROL1__(byte, 7)

  key+= chr(byte)

print(f"Key: {key}")
Run the script and you will receive the key to decrypt the first C4TB file: DaCubicleLife101.
4.2 Decrypt catmeme2.jpg.c4tb
Below is the decompiled and annotated VM code from the second C4TB file:
__int64 start()
{
  VM_MEM.user_key_0 = 0xBBAAi64;
  VM_MEM.user_key_1 = 0xDDCCi64;
  VM_MEM.user_key_2 = 0xFFEEi64;
  VM_MEM.user_key_3 = 0xADDEi64;
  VM_MEM.user_key_4 = 0xEFBEi64;
  VM_MEM.user_key_5 = 0xFECAi64;
  VM_MEM.user_key_6 = 0xBEBAi64;
  VM_MEM.user_key_7 = 0xCDABi64;
  VM_MEM.value_0___ = 0xA059i64;
  VM_MEM.value_1___ = 0x6A4Di64;
  VM_MEM.value_2___ = 0xDE23i64;
  VM_MEM.value_3___ = 0x24C0i64;
  VM_MEM.value_4___ = 0x64E2i64;
  VM_MEM.value_5___ = 0x59B1i64;
  VM_MEM.value_6___ = 0x7207i64;
  VM_MEM.value_7___ = 0x7F5Ci64;
  VM_MEM.user_key_group_1 = (VM_MEM.user_key_3 << 48) | (VM_MEM.user_key_2 << 32) | (VM_MEM.user_key_1 << 16) | VM_MEM.user_key_0;
  VM_MEM.user_key_group_2 = (VM_MEM.user_key_7 << 48) | (VM_MEM.user_key_6 << 32) | (VM_MEM.user_key_5 << 16) | VM_MEM.user_key_4;
  VM_MEM.value_group_1___ = (VM_MEM.value_3___ << 48) | (VM_MEM.value_2___ << 32) | (VM_MEM.value_1___ << 16) | VM_MEM.value_0___;
  VM_MEM.value_group_2___ = (VM_MEM.value_7___ << 48) | (VM_MEM.value_6___ << 32) | (VM_MEM.value_5___ << 16) | VM_MEM.value_4___;
  VM_MEM.iterator = 0i64;
  VM_MEM.is_continue = 1i64;
  VM_MEM.num_matched_bytes = 0i64;
  VM_MEM.vm_return = 0i64;
  VM_MEM.Ox343FD = 0x343FDi64;
  VM_MEM.Ox269EC3 = 0x269EC3i64;
  VM_MEM.Ox80000000 = 0x80000000i64;
  VM_MEM.PRNG = 0x1337i64;
  while ( VM_MEM.is_continue == 1 )
  {
    if ( VM_MEM.iterator < 8 )
    {
      VM_MEM.user_key_compare = (unsigned __int64)VM_MEM.user_key_group_1 >> (8 * (unsigned __int8)VM_MEM.iterator);
      VM_MEM.value_compare___ = (unsigned __int64)VM_MEM.value_group_1___ >> (8 * LOBYTE(VM_MEM.iterator));
    }
    iterator = VM_MEM.iterator;
    LOBYTE(iterator) = iterator > 7;
    if ( iterator )
    {
      VM_MEM.user_key_compare = (unsigned __int64)VM_MEM.user_key_group_2 >> (8 * (unsigned __int8)VM_MEM.iterator);
      VM_MEM.value_compare___ = (unsigned __int64)VM_MEM.value_group_2___ >> (8 * LOBYTE(VM_MEM.iterator));
    }
    VM_MEM.user_key_compare = (unsigned __int8)VM_MEM.user_key_compare;// only get the low byte
    VM_MEM.value_compare___ = (unsigned __int8)VM_MEM.value_compare___;// only get the low byte
    VM_MEM.PRNG = (VM_MEM.PRNG * VM_MEM.Ox343FD + VM_MEM.Ox269EC3) % (unsigned __int64)VM_MEM.Ox80000000;// microsoft_rand_prng
    VM_MEM.nex_random = VM_MEM.PRNG;
    VM_MEM.nex_random = (unsigned __int64)VM_MEM.PRNG >> (8 * (unsigned __int8)(VM_MEM.iterator % 4ui64));
    VM_MEM.xor_byte = (unsigned __int8)VM_MEM.nex_random;
    VM_MEM.key_xor_rand = VM_MEM.user_key_compare ^ VM_MEM.xor_byte;
    exit_early = VM_MEM.value_compare___;
    LOBYTE(exit_early) = VM_MEM.key_xor_rand == exit_early;
    if ( !exit_early )
      VM_MEM.is_continue = 0i64;
    matched_key_value = VM_MEM.value_compare___;
    LOBYTE(matched_key_value) = VM_MEM.key_xor_rand == matched_key_value;
    if ( matched_key_value )
      ++VM_MEM.num_matched_bytes;
    done = ++VM_MEM.iterator;
    LOBYTE(done) = done > 15;
    if ( done )
      VM_MEM.is_continue = 0i64;
  }
  if ( VM_MEM.num_matched_bytes == 16 )
    VM_MEM.vm_return = 1i64;
  if ( VM_MEM.num_matched_bytes != 16 )
    VM_MEM.vm_return = 0i64;
  return VM_MEM.vm_return;
}
The magic value 0x343FD and 0x269EC3 are used in the implementation of Microsoft Rand (Reference). Therefore, it is easy to deduce that the program generates multiple random integers from a hard-coded seed (0x1337). Each iteration will generate the next random number, extract a byte from it, and XOR with a hard-coded byte to compare with the corresponding byte in the user’s key. The script below is transferred from the program to print the key:
v0 = 0xA059
v1 = 0x6A4D
v2 = 0xDE23
v3 = 0x24C0
v4 = 0x64E2
v5 = 0x59B1
v6 = 0x7207
v7 = 0x7F5C

group = (v7 << (16*7)) | (v6 << (16*6)) | (v5 << (16*5)) | (v4 << (16*4)) | (v3 << (16*3)) | (v2 << (16*2)) | (v1 << (16*1)) | (v0 << (16*0))

key = ""

rand = 0x1337   #rand seed
for i in range(16):
  byte = (group >> (i*8)) & 0xFF
  rand = (rand * 0x343FD + 0x269EC3) % 0x80000000;# microsoft_rand_prng
  rand_byte = (rand >> (8 * (i % 4))) & 0xFF
  key += chr(byte ^ rand_byte)

print(f"Key: {key}")
Run the script and you will receive the key to decrypt the second C4TB file: G3tDaJ0bD0neM4te.
4.3 Decrypt catmeme3.jpg.c4tb
Below is the decompiled and annotated VM code from the third C4BT file:
__int64 start()
{
  VM_MEM.user_key_0 = 0xBBAAi64;
  VM_MEM.user_key_1 = 0xDDCCi64;
  VM_MEM.user_key_2 = 0xFFEEi64;
  VM_MEM.user_key_3 = 0xADDEi64;
  VM_MEM.user_key_4 = 0xEFBEi64;
  VM_MEM.user_key_5 = 0xFECAi64;
  VM_MEM.user_key_6 = 0xBEBAi64;
  VM_MEM.user_key_7 = 0xCDABi64;
  VM_MEM.user_key_group_1 = (VM_MEM.user_key_3 << 48) | (VM_MEM.user_key_2 << 32) | (VM_MEM.user_key_1 << 16) | VM_MEM.user_key_0;
  VM_MEM.user_key_group_2 = (VM_MEM.user_key_7 << 48) | (VM_MEM.user_key_6 << 32) | (VM_MEM.user_key_5 << 16) | VM_MEM.user_key_4;
  VM_MEM.OxFFFFFFFFF = 0xFFFFi64;
  VM_MEM.whh = VM_MEM.OxFFFFFFFFF;
  VM_MEM.OxFFFFFFFFF = (VM_MEM.OxFFFFFFFFF << 16) | VM_MEM.whh;
  VM_MEM.iterator = 0i64;
  VM_MEM.match_count = 0i64;
  VM_MEM.vm_return = 0i64;
  VM_MEM.user_key_hash_1 = 0x1505i64;           // djb2 hash magic value
  while ( VM_MEM.iterator < 4 )                 // first 4 bytes of user key (key[:4])
  {
    VM_MEM.current_byte = (unsigned __int64)VM_MEM.user_key_group_1 >> (8 * (unsigned __int8)VM_MEM.iterator);
    VM_MEM.current_byte = (unsigned __int8)VM_MEM.current_byte;
    VM_MEM.whh = VM_MEM.user_key_hash_1;
    VM_MEM.user_key_hash_1 = 32 * VM_MEM.user_key_hash_1 + VM_MEM.whh + VM_MEM.current_byte;//
                                                // hash = ((hash << 5) + hash) + c;
    ++VM_MEM.iterator;
  }
  VM_MEM.user_key_hash_1 &= VM_MEM.OxFFFFFFFFF;
  VM_MEM.hash_value_1 = 0x7C8DF4CBi64;          // target djb2 hash value
  first_hash_matched = VM_MEM.user_key_hash_1;
  LOBYTE(first_hash_matched) = VM_MEM.hash_value_1 == first_hash_matched;
  if ( first_hash_matched )
    ++VM_MEM.match_count;
  is_first_hash_matched = VM_MEM.match_count;
  LOBYTE(is_first_hash_matched) = is_first_hash_matched > 0;
  if ( is_first_hash_matched )
  {
    VM_MEM.user_key_hash_2 = 0i64;
    while ( VM_MEM.iterator < 8 )               // next 4 bytes of user key (key[4:8])
    {
      VM_MEM.current_byte = (unsigned __int64)VM_MEM.user_key_group_1 >> (8 * (unsigned __int8)VM_MEM.iterator);
      VM_MEM.current_byte = (unsigned __int8)VM_MEM.current_byte;
      VM_MEM.user_key_hash_2 = (unsigned int)__ROR4__(VM_MEM.user_key_hash_2, 13);// ROR13 hash
      VM_MEM.user_key_hash_2 += VM_MEM.current_byte;
      ++VM_MEM.iterator;
    }
    VM_MEM.user_key_hash_2 &= VM_MEM.OxFFFFFFFFF;
    VM_MEM.hash_value_2 = 0x8B681D82i64;        // target ror13 hash value
    second_hash_matched = VM_MEM.user_key_hash_2;
    LOBYTE(second_hash_matched) = VM_MEM.hash_value_2 == second_hash_matched;
    if ( second_hash_matched )
      ++VM_MEM.match_count;
  }
  is_first_two_hashes_matched = VM_MEM.match_count;
  LOBYTE(is_first_two_hashes_matched) = is_first_two_hashes_matched > 1;
  if ( is_first_two_hashes_matched )            // last 8 bytes of the user key (key[8:16])
  {
    VM_MEM.value_7___ = 1i64;
    VM_MEM.value_group_1___ = 0i64;
    VM_MEM.user_key_hash_3 = 0i64;
    for ( VM_MEM.iterator = 0i64; VM_MEM.iterator < 8; ++VM_MEM.iterator )
    {
      VM_MEM.current_byte = (unsigned __int64)VM_MEM.user_key_group_2 >> (8 * LOBYTE(VM_MEM.iterator));
      VM_MEM.current_byte = (unsigned __int8)VM_MEM.current_byte;
      VM_MEM.value_7___ = (VM_MEM.value_7___ + VM_MEM.current_byte) % 0xFFF1ui64;// Adler‑32 checksum magic constant: 0xFFF1
      VM_MEM.value_group_1___ = (VM_MEM.value_group_1___ + VM_MEM.value_7___) % 0xFFF1ui64;
    }
    VM_MEM.user_key_hash_3 = (VM_MEM.value_group_1___ << 16) | VM_MEM.value_7___;
    VM_MEM.user_key_hash_3 &= VM_MEM.OxFFFFFFFFF;
    VM_MEM.hash_value_3 = 0xF910374i64;         // target alder32 checksum value
    third_hash_matched = VM_MEM.user_key_hash_3;
    LOBYTE(third_hash_matched) = VM_MEM.hash_value_3 == third_hash_matched;
    if ( third_hash_matched )
      ++VM_MEM.match_count;
  }
  is_first_three_hashes_matched = VM_MEM.match_count;
  LOBYTE(is_first_three_hashes_matched) = is_first_three_hashes_matched > 2;
  if ( is_first_three_hashes_matched )          // hash of the entire key
  {
    VM_MEM.value_0___ = 0x193i64;
    VM_MEM.value_1___ = 0x100i64;
    VM_MEM.Ox01000193 = (VM_MEM.value_1___ << 16) | VM_MEM.value_0___;// fnv1_prime
    VM_MEM.value_3___ = 0x9DC5i64;
    VM_MEM.value_4___ = 0x811Ci64;
    VM_MEM.Ox811C9DC5 = (VM_MEM.value_4___ << 16) | VM_MEM.value_3___;// 0x811C9DC5 : fnv1 init hash
    VM_MEM.value_6___ = 0x100000000i64;
    VM_MEM.user_key_hash_4 = VM_MEM.Ox811C9DC5;
    for ( VM_MEM.iterator = 0i64; VM_MEM.iterator < 16; ++VM_MEM.iterator )
    {
      if ( VM_MEM.iterator < 8 )
        VM_MEM.current_byte = (unsigned __int64)VM_MEM.user_key_group_1 >> (8 * LOBYTE(VM_MEM.iterator));
      iterator = VM_MEM.iterator;
      LOBYTE(iterator) = iterator > 7;
      if ( iterator )
        VM_MEM.current_byte = (unsigned __int64)VM_MEM.user_key_group_2 >> (8 * LOBYTE(VM_MEM.iterator));
      VM_MEM.current_byte = (unsigned __int8)VM_MEM.current_byte;
      VM_MEM.user_key_hash_4 = VM_MEM.Ox01000193 * VM_MEM.user_key_hash_4 % (unsigned __int64)VM_MEM.value_6___;
      VM_MEM.user_key_hash_4 ^= VM_MEM.current_byte;
    }
    VM_MEM.user_key_hash_4 &= VM_MEM.OxFFFFFFFFF;
    VM_MEM.hash_value_4 = 0x31F009D2i64;        // target fnv1 hash value
    forth_hash_matched = VM_MEM.user_key_hash_4;
    LOBYTE(forth_hash_matched) = VM_MEM.hash_value_4 == forth_hash_matched;
    if ( forth_hash_matched )
      ++VM_MEM.match_count;
  }
  if ( VM_MEM.match_count == 4 )
    VM_MEM.vm_return = 1i64;
  return VM_MEM.vm_return;
}
This program is the most complex of the three. It computes multiple hash values for different sections of the key using various hash and checksum algorithms. While determining the type of hash algorithm is not essential for obtaining the key, it adds valuable context to my analysis.
To identify the hash functions being used, simply search the Internet for the associated magic values. Here is a summary of the checks:
djb2(key[:4]) == 0x7C8DF4CBror13(key[4:8]) == 0x8B681D82adler32(key[8:16]) == 0x0F910374fnv1(key) == 0x31F009D2
The first two hash values can be easily brute-forced since they each use only 4 bytes of the key. The third hash value will require significantly more time to brute-force. However, I was fortunate to find an example where adler32('password') = 0x0F910374 in a Google CTF 2018 writeup.Thank you very much SCRYH for the example in you write up!
The last hash value helps eliminate collisions from the previous hash functions and confirms the key. Combining all of this information, I wrote the script below to brute-force and reconstruct the key:
import itertools
import string

def djb2(s: str) -> int:
    hash_value = 5381
    for char in s:
        hash_value = ((hash_value << 5) + hash_value) + ord(char)
    return hash_value & 0xFFFFFFFF

def ror13(s: str) -> int:
    hash_value = 0
    for char in s:
        hash_value = (hash_value >> 13) | (hash_value << (32 - 13))  # ROR13
        hash_value = (hash_value + ord(char)) & 0xFFFFFFFF
    return hash_value

def adler32(s: str) -> int:
    a = 1
    b = 0
    for char in s:
        byte = ord(char)
        a = (a + byte) % 0xFFF1
        b = (b + a)    % 0xFFF1
    return (b << 16) | a

def fnv1(s: str) -> int:
    hash_value = 0x811C9DC5
    fnv_prime  = 0x01000193
    for char in s:
        hash_value = (hash_value * fnv_prime) ^ ord(char)
        hash_value &= 0xFFFFFFFF
    return hash_value

HASH_FUNCTIONS = {
    "djb2": djb2,
    "ror13": ror13,
    "adler32": adler32,
    "fnv1": fnv1
}

def brute_force_hash(target_hash: int, length: int, hash_func_name: str, charset=string.printable):
    if hash_func_name not in HASH_FUNCTIONS:
        raise ValueError("Unsupported hash function")
    hash_func  = HASH_FUNCTIONS[hash_func_name]
    candidates = []
    for candidate in itertools.product(charset, repeat=length):
        candidate_str = ''.join(candidate)
        if hash_func(candidate_str) == target_hash:
            candidates.append(candidate_str)
    return candidates

if __name__ == "__main__":
    # Define the character set: lowercase + uppercase + digits + special characters
    charset = string.ascii_letters + string.digits + string.punctuation

    # brute force djb2 (key[:4])
    length      = 4
    hash_func   = "djb2"
    target_djb2 = 0x7C8DF4CB
    djb2_candidates = brute_force_hash(target_djb2, length, "djb2")

    # brute force ror13 (key[4:8])
    length          = 4
    hash_func       = "ror13"
    target_ror13    = 0x8B681D82
    ror13_candidates = brute_force_hash(target_ror13, length, "ror13")

    # assert adler32 hash retrived here: https://devel0pment.de/?p=587
    # (key[8:16])
    target_adler32     = 0x0F910374
    adler32_candidates = ["password"]
    assert adler32(adler32_candidates[0]) == target_adler32

    # brute force fnv_1
    target_fnv1 = 0x31F009D2
    combinations = itertools.product(djb2_candidates, ror13_candidates, adler32_candidates)

    key_candidates = []

    for key_combination in combinations:
        key = ''.join(key_combination)
        if fnv1(key) == target_fnv1:
            key_candidates.append(key)

    print("Key candidates: ")
    print(key_candidates)


    # End measuring time
    end_time = time.time()

    # Calculate brute force time in seconds
    time_spent = end_time - start_time

    # Print the actual time taken for brute-forcing
    print(f"Time spent for brute-force: {time_spent:.6f} seconds")
It took a couple of minutes to brute-force the key: VerYDumBpassword.
Stage 5- The Final Flag
No, of course, I didn’t wait until this time to decrypt all the files :). I am just presenting them all in this section to demonstrate how different parts of the flag are retrieved to create the final flag.
Now, you can return to QEMU and run the decrypt-file commands to start the decryption process:
FS0:\> decrypt_file catmeme1.jpg.c4tb DaCubicleLife101
FS0:\> decrypt_file catmeme2.jpg.c4tb G3tDaJ0bD0neM4te
FS0:\> decrypt_file catmeme3.jpg.c4tb VerYDumBpassword
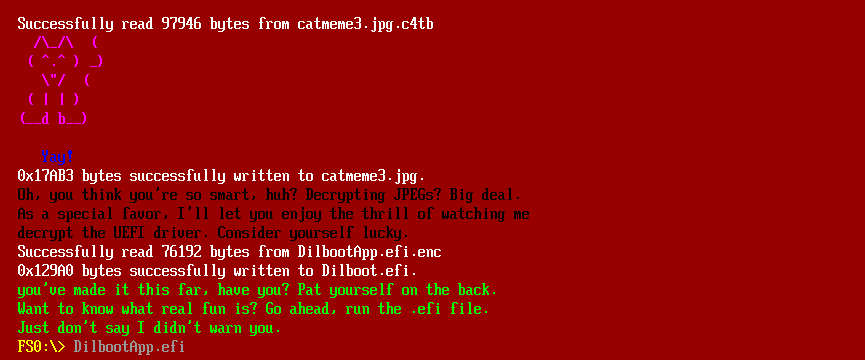
The decrypt-file command checks if all three files are decrypted, it will decrypt the file named DilbootApp.efi.enc and asks if I dare to run it, and I did:
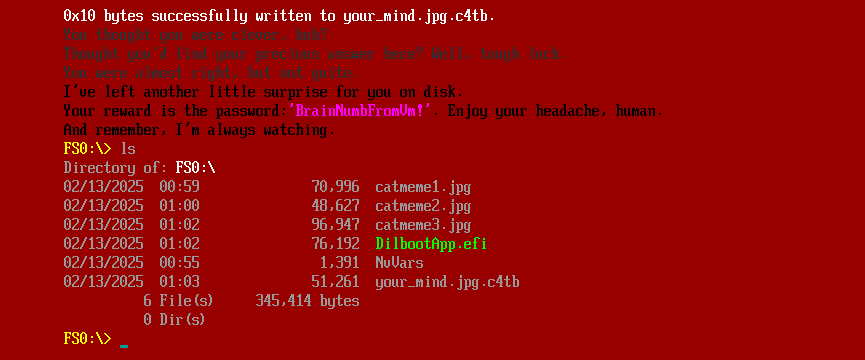
It drops the file your_mind.jpg.c4tb on disk and provides a password: BrainNumbFromVm!:
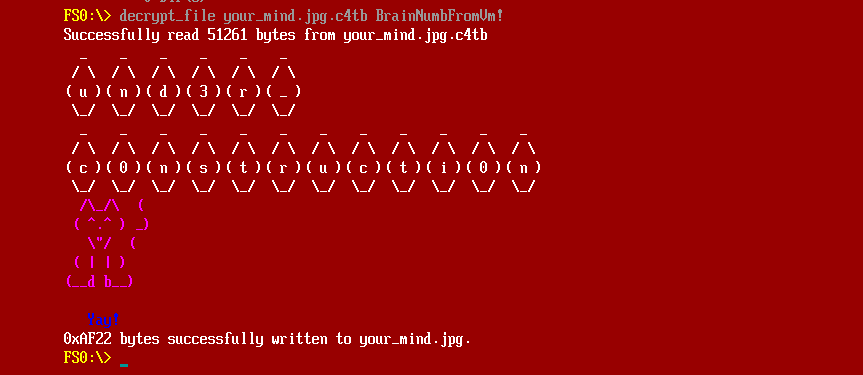
The password is exactly 16 bytes long, so it must be a decryption for the newly dropped file. This time, it also provides the string und3r_c0nstructi0n together with the decrypted file:
Below are all the pieces of the puzzle:
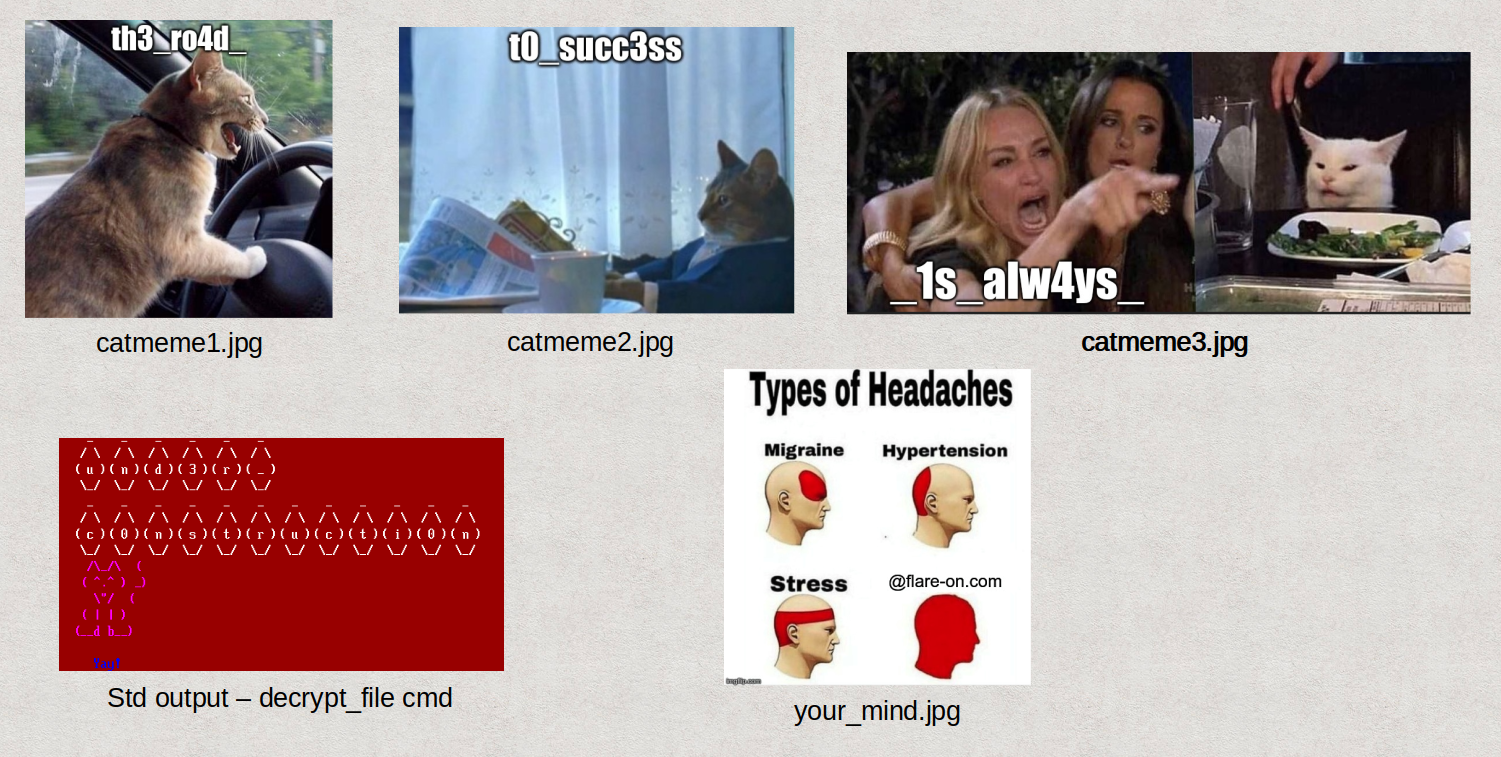
Final flag: [email protected]
Thoughts
Symbolic execution can be used to decrypt the files catmeme1.jpg.c4tb and catmeme2.jpg.c4tb without deobfuscating the VM code; however, it is likely to fail when attempting to decrypt catmeme3.jpg.c4tb. Without a clear understanding of the VM code, you could make educated guesses and test your hypotheses in hopes of finding a shortcut, though this might lead to a dead end.
In this write-up, I presented a more systematic approach to disassembling and decompiling the VM byte code for a comprehensive analysis. While this method may require additional time and effort initially, it enables a thorough examination of the VM code to determine the most effective way to retrieve the keys. The more VM code you have to analyze, the greater the potential payoff.
This has been another enjoyable challenge from the Flare-On team. Special thanks to Mark Lechtik (@_marklech_) for creating such a great challenge!
